Appetizers

Potato Samosas

Ingredients
For the filling
1 12 pounds potatoes, cubed
2 tablespoons oil
2 teaspoons cumin seeds
2 tablespoons fresh ginger, peeled and minced
1-3 fresh green chile peppers, such as jalapeño, minced
1 12 tablespoons ground coriander
12 teaspoon salt, or to taste
12 teaspoon garam masala
14 cup fresh cilantro, finely chopped
1 teaspoon mango powder (Optional.  I’ve made it many times without, one time with, and it’s amazing regardless.)
1 cup frozen peas
_
For the assembly_
1 12 cups self-rising flour
3 tablespoons oil
12 teaspoon ajwain seeds, coarsely ground (Optional.  I’ve omitted these due to availability with no problem.)  
12 teaspoon salt, or to taste
13 cup water, approximately
Extra all purpose flour for dusting
1 12 to 2 cups peanut oil, for deep-frying

Instructions
1.  For samosa filling: Bring a large pot of water to boil and cook the potatoes until tender, about 20 minutes.  Heat the oil in a large nonstick wok or saucepan over medium-high heat and add the cumin seeds; they should sizzle upon contact with the hot oil. Mix in the potatoes.

2. Stir about 2 minutes, then add the ginger, green chile peppers, coriander, salt, and garam masala, and stir occasionally until the potatoes are golden, about 10 minutes.  

3. Add the cilantro, mango powder and peas and cook another 5 minutes. Remove from heat and let cool before using.

4. For assembly: Place the self-rising flour, oil, ajwain seeds, and salt in a food processor and pulse a few times to mix. With the motor running, pour the water in a slow stream and process until the flour gathers into a semi-firm ball that does not stick to the sides of the work bowl. Remove to a bowl, cover with plastic wrap or a lid, and let rest at least 1 hour and up to 4 hours. (This allows the gluten to develop.) If keeping for a longer period, refrigerate the dough.

5. Lightly oil your clean hands (to prevent the dough from sticking to them), then divide into 12 1 12-inch balls. Cover with aluminum foil and set aside. Working with each ball separately, flatten it into a disc with your fingertips, coat well with dry flour, the roll with a rolling pin into a 6- to 7-inch circle of uniform 18-inch thickness. If the dough sticks to the rolling surface, coat once again with flour.

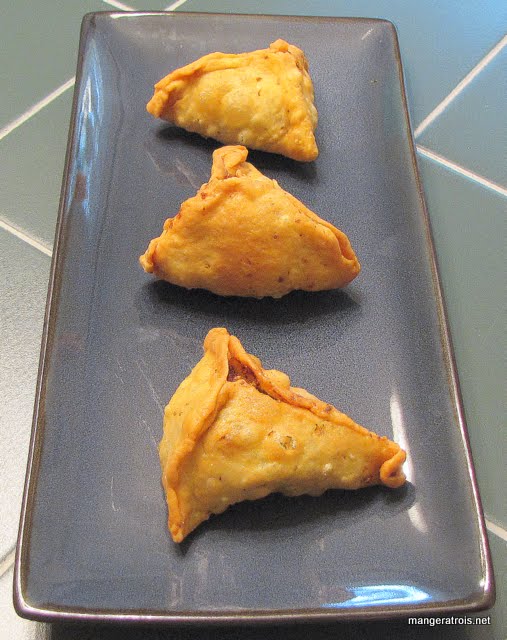
6. Cut the circle in half and brush with water about 12-inch in, along the straight edge. Pick up the two corners and place one over and around the other along the straight edge, the press along the straight edge to seal, making a cone. Also pinch the point of the cone to seal. (Alternatively you can make the dough circles using a pasta roller on a thick setting.  I tried this method and it worked amazingly well.)  

7. Hold the cone between your thumb and forefinger, with the pointed side down toward the work surface. Fill the mouth of the cone with 2 to 3 tablespoons of filling. Brush the edges of the mouth of the cone with water and press them together to seal. You should end up with a stuffed triangular pastry. Cover with foil and set aside until ready to fry. Repeat with the other balls of dough.

8. Heat the oil in a wok or skillet over medium-high heat until it reaches 325*F to 350*F on a frying thermometer, or when a small piece of the dough dropped into the hot oil rises to the top after 15 to 20 seconds. Place the samosas in the wok, as many as it can hold at one time without crowding, and fry, turning them a few times with a slotted spatula, until crispy and golden on all sides, 4 to 5 minutes. (If the samosas brown too quickly, it means the heat is too high; lower it.) Transfer to paper towels to drain, then serve.

Samosas

Comments
This recipe is from 1,000 Indian Recipes by Neelam Batra.  I’ve made it numerous times and each time it gets easier.  I’m not going to lie and say “this isn’t as hard as it looks” because it is a pretty complicated recipe.  However it is well worth the effort.  I like to serve these with mango chutney.  Yum.  The trick of using the pasta roller did make the whole process infinitely faster.

1,000 Indian Recipes

Fresh Tomato Salsa (The Winter Version)

Ingredients
2-3 pints small tomatoes, quartered
14 cup green onions, chopped
14 cup cilantro, chopped
1 tablespoon fresh oregano, chopped
2 cloves garlic, minced
1 teaspoon jalapeño pepper, minced (Optional.  Use more or less as desired)
1 tablespoon olive oil
2 teaspoons fresh lime juice
Salt and freshly ground black pepper, to taste

Instructions
1. Mix all ingredients in a medium bowl.  If desired, process half of the salsa in a food processor or blender.  

2. Let sit, loosely covered, at room temperature, for the flavors to blend. Serve immediately or refrigerate and serve within 4 hours.

Salsa

Comments
This recipe originally came from The New Basics Cookbook.  It ends up being different every time I make it due to availability of ingredients.  In the winter, when delicious fresh tomatoes can’t be found, I make it with small tomatoes since those seem to survive in the grocery store better than the alternatives.  The bowl in the picture is a quadruple recipe since I was feeding a crowd and always err on the side of too much.  I served some chopped avocado with the salsa so that people could add their own if desired, but apparently I was the only person in the group who likes avocado!

New Basics Cookbook

Baked Stuffed Mushrooms with Goat Cheese and Thyme

Ingredients
1 slice white sandwich bread, torn into pieces
6 tablespoons olive oil, divided
3 tablespoons garlic, minced, divided (about 9 cloves)
Salt and ground black pepper
24 white mushroom caps, wiped clean and stems removed (1 12 to 2 inches in diameter, they will shrink during cooking)
4 ounces goat cheese, softened
1 teaspoon fresh thyme, minced

Instructions
1. Heat the oven to 300*F. Pulse the bread in a food processor to coarse crumbs, about 6 pulses. Toss crumbs with 1 tablespoon of the oil, 1 tablespoon of the garlic, 18 teaspoon salt, and 18 teaspoon pepper. Spread the crumbs on a rimmed baking sheet and bake, stirring occasionally, until lightly browned and dry, about 15-20 minutes; set aside to cool.

2. Increase the oven temperature to 450*F and line a baking sheet with foil. Mix 4 more tablespoons of the oil with the remaining 2 tablespoons garlic, 14 teaspoon salt, and 18 teaspoon pepper, then toss with mushroom caps. Lay the caps, gill side down, on the prepared baking sheet. Roast the mushrooms until they release their juices, about 20 minutes. Flip the caps over and continue to roast until the liquid has evaporated completely and the mushrooms are brown all over, about 10 minutes longer. Remove the mushrooms from the oven, flip gill side down, and set aside to drain any excess moisture.

3. Line a second baking sheet with foil; set aside. Mix the goat cheese, thyme, and remaining tablespoon oil together until smooth and season with salt and pepper to taste. Transfer the cheese mixture to a small zip-top bag and snip off a corner of the bag using scissors. Pipe about 1 teaspoon of the goat cheese mixture into each mushroom cap and top with bread crumbs. Transfer the stuffed mushrooms to the prepared baking sheet. (I was able to press the filled mushrooms into a bowl with the crumbs without the filling falling out.)  

4. To store: Wrap the baking sheet tightly with plastic wrap and refrigerate for up to 3 days. (If you don’t have room for a baking sheet in your refrigerator, you can stack the stuffed mushrooms inside a casserole dish - one on top of the other - as long as the layers are separated by sheets of parchment paper.)

5. To serve: Adjust an oven rack to the middle position and heat the oven to 450*F. Unwrap the mushrooms and bake until the mushrooms and filling are hot and the crumbs are crisp, about 10 minutes.  

Stuffed Mushrooms

Comments
I love stuffed mushrooms and, when planning a meal to go with Tiramisu, they seemed like a great appetizer.  Since I was making them for Game Day, I found this recipe in The Best Make-Ahead Recipe which is one of America’s Test Kitchen’s fantastic tomes.  Making them the day before worked perfectly, they were delicious when I cooked them the next day and everyone gobbled them up.  I was able to make 25 mushrooms with the ingredients here which were great for an appetizer portion.  If you’re aiming for a light lunch, you might want to increase all the amounts.

The Best Make-Ahead Recipe

The Best Ever Spinach and Artichoke Dip

Ingredients
20 ounces fresh spinach, well rinsed and stems trimmed
4 tablespoons unsalted butter
1 cup yellow onions, chopped
1 tablespoon garlic, minced
1 teaspoon salt
12 teaspoon ground black pepper
14 teaspoon cayenne
14 cup all purpose flour
1 cup milk
1 cup half and half
2 teaspoons fresh lemon juice
1 cup Brie, rind removed
1 cup Monterey jack cheese, grated
16 ounces frozen artichoke hearts, thawed and chopped
12 ounces center-cut bacon, fried crisp, drained, and chopped
14 cup Parmesan cheese, grated

Instructions
1. Preheat the oven to 350*F. Lightly grease a 2-quart casserole dish and set aside.

2. Place spinach in an uncovered microwave safe bowl and microwave for 2 minutes, working in batches if necessary.  Once spinach is microwaved, roughly chop.  

3. In a medium pot, melt the butter over medium-high heat. Add the onions and cook, stirring, for 3 minutes. Add the garlic, salt, pepper, and cayenne and cook, stirring, for 1 minute. Add the flour and cook, stirring constantly, to make a light roux, about 2 minutes.

4. Add the milk and half-and-half in a steady stream, and cook, stirring constantly, until thick and creamy, 2 to 3 minutes. Add the cooked spinach, lemon juice, brie, Monterey jack, artichoke, and bacon and stir well to combine and melt.  

5. Remove from heat and pour into the prepared dish. Top with Parmesan cheese and bake until bubbly, about 10-20 minutes.

6. Remove from the oven and serve hot, with chips, bread, or other desired dippers.

Spinach Artichoke Dip

Comments
I’m a huge fan of Spinach and Artichoke Dip, but it’s hard to find recipes that don’t include mayonnaise, which Art dislikes.  I found this one a few years ago, it’s an Emeril creation.  I’ve been making it ever since and it’s always a hit.  The mix of cheeses and other flavors work extremely well together.  It’s also easy to prepare in advance and just bake before serving.  If you do that, you will need to bake it for 30-45 minutes before it will be toasty enough to serve.

Internet - Emeril Lagasse

Herbed Lima Bean Hummus

Ingredients
10 ounces lima beans (I used fresh, frozen work as well)
1 small onion, chopped
2-3 cloves garlic, smashed with side of a large knife
12 teaspoon salt
1 cup water
18 cup fresh cilantro, chopped
18 cup fresh flat-leaf parsley, chopped
12 teaspoon cumin
18 teaspoon cayenne, or to taste
1-2 tablespoons fresh lemon juice
2 12 tablespoons olive oil
1 tablespoon fresh dill, chopped
1 tablespoon fresh mint, chopped

Instructions
1. Simmer beans, onion, garlic, salt, and water in a 3-quart saucepan, covered, until beans are tender, about 8 minutes. Stir in cilantro and parsley and let stand, uncovered, 5 minutes.

2. Drain bean mixture in a sieve and transfer to a food processor. Add cumin, cayenne, 1 12 tablespoons lemon juice, 2 tablespoons oil, dill, and mint and purée until smooth. Transfer to a bowl and cool to room temperature (or chill), stirring occasionally. Season with salt and pepper and add remaining lemon juice to taste.

3. Mound dip in a serving bowl and drizzle with remaining tablespoon oil.

Lima Bean Hummus

Comments
This recipe is from Epicurious.com.  I grew up only having lima beans in succotash and, I’ve got to admit, I’m not a fan.  Art and I were discussing the potential that we’d get some with our CSA box and he pointed out that they’ve got a similar texture to chickpeas.  This set me on the quest for hummus made with lima beans and this recipe is the result of that search.  

I’m still not 100% sure how I felt about this dip.  It was very flavorful thanks to all of the herbs and spices.  We ate it with pita chips and I think it was tasty and delicious.  I believe I’ll need to make it again in the future to pin down whether or not I really like it.  Art, on the other hand, is a firm believer in the tastiness of this dip.

Internet - Epicurious

Salsa Verde

Ingredients
10-12 tomatillos, husked and rinsed
2-4 poblano or other mild fresh green chiles, roasted and cleaned
3 tablespoon olive oil
2 large onions, diced
5 cloves garlic, minced
1 teaspoon oregano
1 cup water
Salt and freshly ground black pepper
12 cup fresh cilantro leaves, chopped
14 cup lime juice, freshly squeezed

Instructions
1. Heat the oven to 400*F. Put the tomatillos on a baking sheet and roast until the skins are lightly browned and blistered, about 20 minutes. Remove the tomatillos; when they’re cool enough to handle, chop them finely along with the chiles, saving their juices.

2. While the tomatillos are roasting, put the oil in a large deep skillet over medium heat. Add the onions and garlic and cook, stirring occasionally, until they are very soft and lightly browned, about 10 minutes. Add the tomatillos, chiles, oregano, water, and a large pinch of salt and pepper; stir and bring to a low simmer. Cook, stirring occasionally, until the mixture thickens slightly, 10 to 15 minutes.

3. Stir in the cilantro and lime juice, taste, and adjust the seasoning. Serve at room temperature or refrigerate for up to 2 days.  

Note: Roast chiles until blackened on a grill, broiler, or straight on the stove burner if you have a gas grill.  Once well charred, place in a zip-top bag and seal for 10 minutes.  Remove the peppers from the bag and gently scrap off the charred skin with a knife.  Rinse under running water.  Cut off the stem, slice the pepper in half, and scrap out the seeds and membranes.  

Salsa Verde

Comments
This recipe is from the 10th Anniversary Edition of Mark Bittman’s How to Cook Everything.  I used a mixture of green and purple tomatillos and four mild chiles.  Sadly I didn’t get a picture of this but it turned out deliciously.  I used it to make Slow Cooker Pork Chile Verde.  One recipe of this salsa is enough for 12 of a pork loin roast.

Edit: Using cooking liquid from crock potted pork in replace of the water makes this even more delicious.

How to Cook Everything (10th Anniversary)

Fresh Tomato Corn Salsa

Ingredients
6-8 large ripe tomatoes, preferably good, meaty tomatoes
2 bunches green onions, cut into 3-4 inch lengths
1 bunch cilantro, stems trimmed and leaves washed thoroughly
2 tablespoons fresh oregano
4-6 cloves garlic
Jalapeño pepper, to taste (I am not a pepper head.  I tend to omit the pepper all together but this time I used half of a small one, scrapped and seeded)
2 tablespoons olive oil
Zest of 2 limes
Juice of 2 limes
3 ears of corn, kernels cut from the cobs (uncooked)
Salt and freshly ground black pepper to taste

Instructions
1. Cut the tomatoes in half lengthwise and remove the seeds with your finger.  Using a food processor process until desired consistency.  I like a chunky salsa so I don’t puree them into oblivion.  Place processed tomatoes in large bowl.  

2. Add the green onion, cilantro leaves, oregano, garlic, pepper, olive oil, zest, and lime juice to the food processor and process until the desired consistency is reached.   You may need to do this in batches depending on the size of your food processor.  Add the onion mixture to the bowl with tomatoes.  

3. Stir corn kernels into the bowl contents and season with salt and pepper to taste.  

4. Cover salsa and chill in refrigerator for a few hours to allow flavors to meld well.  Eat soon.

Note:  If you do not have a food processor you can chop and mince all ingredients by hand, then mix in a large bowl.

Fresh Tomato and Corn Salsa

Comments
This is a modified version of the Fresh Tomato Salsa recipe from The New Basics Cookbook.  I’ve been tweaking the original recipe for years now and it varies in colour from green to red depending on my current whims regarding cilantro to tomato ratio.  For this batch I used a combination of red and yellow tomatoes, plenty of green stuff, and delicious fresh corn.  I have never added corn to fresh salsa before and it’s pretty fantastic.  I heartily recommend it!

This salsa is highly flexible.  I recommend that you make it with a small bowl of “tasting chips” next to you.  This will be especially helpful for adjusting the salt.  I find that I omit it more often than not due to the amount of salt on most tortilla chips.

New Basics Cookbook

Stuffed Pepper Poppers

Ingredients
3-4 large jalapeño peppers
4 ounces goat Cheese
2 tablespoons bacon, chopped and cooked until crisp

Instructions
1. Preheat oven to 350*F.

2. Cut off the top of the peppers and gently scrap out the inside of the pepper with a table knife.

3. In a small spice grinder or food processor, mix the bacon and goat cheese until completely integrated.

4. Spoon cheese mixture into a ziptop bag, cut off a corner of the bag, and pipe the cheese mixture into the peppers.

5. Stand peppers in either a pepper roasting rack or, if you don’t have such a gadget, a high-sided bowl filled with rice will do the trick. If using a bowl with rice, place it in the oven while pre-heating so that the rice will heat up and cook the peppers more evenly.

6. Place peppers in oven and cook for 25 minutes.

7. Let cool for 5 minutes before eating.  

Pre-roasted Peppers 
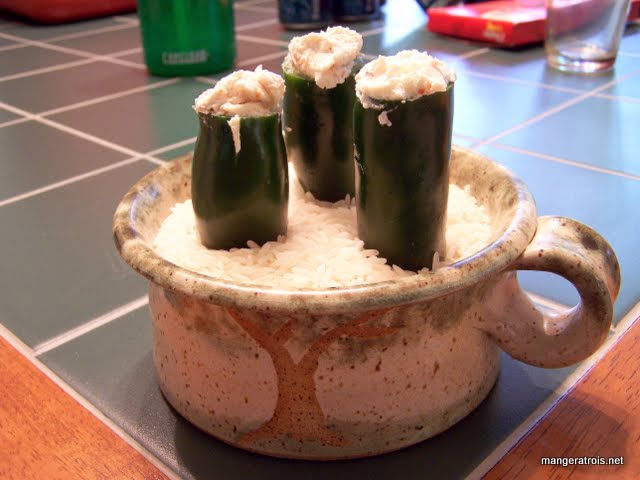
This shows the peppers before roasting.  

Post-roasted peppers 
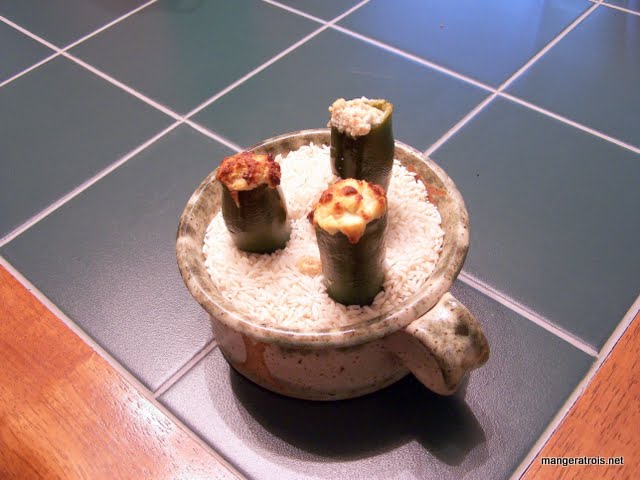
And here are the peppers after roasting.  

Comments
This is the second of the two methods Art devised for making peppers.  We came up with the idea of using a bowl of rice to support the peppers upright together, and it worked perfectly.

Unknown

Bacon Wrapped Peppers

Ingredients
3-4 large jalapeño peppers
6-8 strips of bacon
4 ounces soft goat cheese

Instructions
1. Preheat oven to 350*F.

2. Cut peppers in half and remove membranes and seeds with a table knife.

3. Fill the cavities of the peppers with goat cheese. Then wrap each pepper with a strip of bacon, using a toothpick to secure the ends.

4. Arrange peppers on a broiler pan or a baking sheet with a rack to allow the bacon fat to drip down away from the peppers. Cook for about an hour, checking every 10-20 minutes. The bacon should be crisp but the cheese should not be burned.

5. Let cool for 5 minutes before eating.  

Bacon Wrapped Peppers

Comments
Art loves stuffed peppers.  When he saw peppers at the market he bought six and then prepared them two ways.  I suggested goat cheese to him, so this is one of the two methods of preparation he devised.  He said they were amazing and that cooking really mellows out the hot jalapeño taste.

Unknown